Firmware Update for NST-211C3-RGB [#03142022]
Here is the link to firmware files.
Download, unzip to a folder and follow the steps in the provided instruction.
https://www.vantecusa.com/CKEdit/files/NST-211C3-RGB_FirmwareUpdate12912011122_RTL9210B1.zip
What is the Maximum Capacity Hard Drive can I install into the enclosure or Dock and Power Requirement of the drive? [#33402]
It can vary depending on the age and type of the Enclosures.
Please READ these Limitation:
1) For 2.5" SATA drive, Maximum Capacity alone is not the only thing you have to check, the other important criteria are the thickness of the drive. If your 2.5" enclosure will only fit a drive with the thickness (or height) of 7mm drive, trying to put a 9.5mm thickness drive into the enclosure will not fit.
2) The power requirement of the drive is also very important. Most drives are designed for installing into the systems with unlimited power. If you purchase a big capacity drive with power requirements that exceed the power your USB port can provide, it will not function. This is the fault of your USB port lack of power and your power hungry drive, not the enclosure issue. The enclosure uses minimum power. Your Drive plus the enclosure MUST not exceed the power capability of your USB port.
3) Support AF or 512e drives only, do not support 4Kn drives.
Please READ these Limitation:
1) The power requirement of the drive is also very important. Most drives are designed to draw less than 13 watts per drive. The enclosure uses minimum power and the ac adapter that comes with the enclosure are designed for most standard power requirement of the drives. If you purchase drives that draw too much power (greater than 13 watts) and exceed the specifications of the enclosure ac adapter, it will not function correctly. Please check the label on the drive for the power specifications. If your drives exceeded the limitation, you may have to purchase a bigger ac adapter for your needs, please contact Vantec Support for sizing the ac adapter for your needs and to purchase optional bigger ac adapter.
2) Support AF or 512e drives only, do not support 4Kn drives.
It can vary depending on the age and type of interface of the Dock.
Docks are designed for 2.5" or 3.5" SATA drives, for current shipping docks, 2.5" SATA HDD/SSD, the capacity ranges from 100GB to 4TB, and for 3.5" SATA drive, it is 500GB to 16TB. For older Docks purchased before 2015, it may only support 2TB or less. Please write to support@vantecusa.com for further help or questions.
Please READ these Limitation:
1) The power requirement of the drive is also very important. Most drives are designed to draw less than 13 watts per drive. The dock uses minimum power and the ac adapter that comes with the dock are designed for most standard power requirement of the drives. If you purchase drives that draw too much power (greater than 13 watts) and exceed the specifications of the dock ac adapter, it will not function correctly. Please check the label on the drive for the power specifications. If your drives exceeded the limitation, you may have to purchase a bigger ac adapter for your needs, please contact Vantec Support for sizing the ac adapter for your needs and to purchase optional bigger ac adapter.
2) Support AF or 512e drives only, do not support 4Kn drives.
What is DP Alt Mode for USB-C port? [#041719]
DP Alt Mode is DisplayPort Alternate Mode. DP Alt Mode is a functional extension built into SOME USB-C port. There is two types of USB-C port, with DP Alt Mode and without DP Alt Mode (only as a data port). If your system’s USB-C port comes with DP Alt Mode, it can have DisplayPort functionality for primary or secondary HDMI display. If your system’s USB-C port do not have DP Alt Mode, connecting to a video adapter with HDMI will give you a blank screen.
These DP Alt Mode carry non-USB signals and are optional capabilities unique to the USB-C connector or port, like DisplayPort or Thunderbolt 3. All Apple systems with Thunderbolt 3 can be used with USB-C with DP Alt Mode. Most USB host controller add-on card with USB-C port on Windows systems does not have DP Alt Mode function.
Please check with the system or addon card manufacturer to verify support for USB-C with DP Alt Mode capability before purchasing a USB-C adapter with HDMI port.
What is MST Display or MST monitor Daisy Chaining?
Multi-Stream Transport (MST) is a specification that allows multiple monitors to be Daisy Chain together. This capability allows Video signal to pass from the computer to monitor (1), and then to monitor (2) and more.
This capability is supported in Display Port (DP) v1.2 specification, in general, monitors that have support for daisy chain will have two DisplayPort, one in and one out. Daisy chaining monitor also requires termination of the chain. The last monitor on the chain needs to be terminated, this is done thru the OSD (monitor On Screen Display menu). If you are using a different version of the DisplayPort monitor, should always put the older DPv1.1 as the last monitor in the chain.
Please check the requirement and manuals of the monitor's daisy chaining for further instruction. Daisy chaining does have its limitation due to the amount of video on the chain. In general, the first display will be your primary display and the 2nd and 3rd displays will be cloned.
Besides the monitors, the DP cables used also must be DP version 1.2
Latest Windows and OS X DisplayLink Drivers for NBV-410DU3, NBV-400HU3, NBV-320U3, NBV-200U3, DSH-300U3, DSH-M100U3 [#02172021]
Latest Drivers from DisplayLink on Windows OS (7,8,8.1,10,11) and Mac OS X 10.x to 15.x
For the following products: NBV-410DU3, NBV-400HU3, NBV-320U3, NBV-200U3, DSH-300U3, DSH-M100U3
Date: Nov 29, 2021, OS X Combined Release version 1.2 to 1.6beta.
Please download and unzip to see individual version with release notes.
https://vantecusa.com/CKEdit/images/files/DisplayLink_ManagerGraphicsConnectivity_OSX_Releases.zip
Date: Nov 29, 2021, Windows OS Release version 10.1 M2.
Please download and unzip to see release notes.
https://vantecusa.com/CKEdit/images/files/DisplayLink_USBGraphicsSoftwareforWindows_OS_10_1_M2.zip
Date: Nov 29, 2021, Ubuntu 20.04 Release version 5.4.1.
Please download and unzip to see release notes.
https://vantecusa.com/CKEdit/images/files/DisplayLink_USBGraphicsSoftwareforUbuntu_5_4_1-zip.zip
Connection problem due to Power issue with Dual Bay 2.5" RAID enclosure, NST-272S3-BK [#05022019]
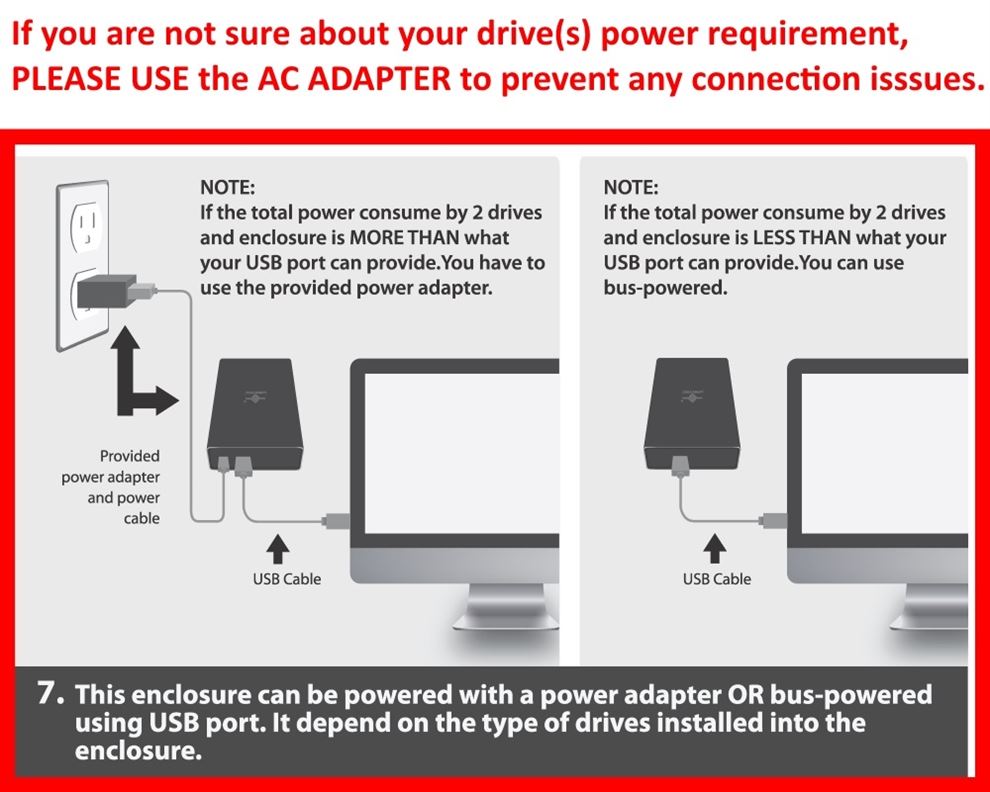
If you are experiencing connection issue, like drop connection, cannot recognize the second drive, unable to format drives or another strange symptom, make sure you are using the provided ac adapter.
This is caused by your drives drawing too much power from your USB port and your USB port cannot provide enough power to the drives.
We have found out current newer SSD (per drive) and HDD (per drive) power requirement are exceeding the power of one USB port as a result the provided AC Adapter is required.
Change FireWire 1394 Card Drivers to Legacy Drivers - Windows XP/Vista/7 ONLY, UGT-FW210 [#06272019]
About Windows 7 ++++++++++++++++++++++++++++++++++++++++++++++
Some Firewire device may have a problem talking to the Firewire Host card due to the Microsoft Firewire drivers issue.
A simple correction is to use the Legacy drivers. See below for help.
Below is the step by step instructions on how to install the Legacy driver so you won‘t have any problems either:
Click Start
Then click on Control Panel
Click on Device Manager
Note: If you don’t see Device Manager listed, click on View By Category on the top right side of the
Control Panel Window.
Then Click on Large Icons
You should now have a list of items in the Control Panel and click on Device Manager.
Under the Device Manager, look down the list for IEEE 1394 Bus Host Controllers and Double Click on it.
It should display something like - 1394 OHCI Compliant Host Controller
Note: If it has the word (Legacy) behind it, you are already setup and you can just exit out.
Next, double-click on the 1394 OHCI Compliant Host Controller
A window will popup saying 1394 OHCI Compliant Host Controller Properties
Click on the Driver Tab
Then look down in the window and click on Update Driver
Then select - Browse my computer for driver software
Next select - Let me pick from a list of device drivers on my computer
It will bring up a list of drivers.
Click on 1394 OHCI Compliant Host Controller (Legacy)
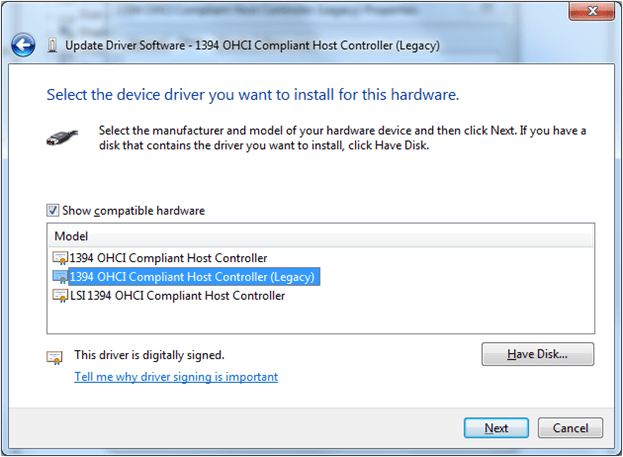
NOTE: It is important that you select the one with (Legacy) after it, just like shown above.
Then click next
once it installs the 1394 OHCI Compliant Host Controller (Legacy),
it will say Windows has successfully updated your driver software.
Click on the Close button and exit out of all of the other windows.
Then Reboot your computer.
You will now be able to import video via the Firewire port on your computer.
NOTE: We have noticed that when Microsoft has issued certain updates, it can cause Windows 7 to switch back to use the original 1394 OHCI Compliant Host Controller driver. If you notice the Firewire device is not working again just repeat the above steps and reinstall the Legacy driver.
How to remove back plate on the NST-520S3-BK [08062021]
Cannot install DisplayLink drivers after a NEW install Windows 10 [#05132021]
After install a NEW installation of Windows 10 OS, please do all the necesssary windows updates before installing the displaylink drivers. The displaylink drivers requires a minimum Windows 10 Anniversary Update for the drivers to install correctly.
The latest driver can be downloaded from DisplayLink website (www.displaylink.com) or our website (www.vantecusa.com).
JMicron RAID Manager software not compatible with OS X 10.15 (Catalina) [#10222019]
The current version of JMicron RAID Manager software is 32bit. It is not compatible with OS X 10.15 (Catalina) because the OS requires all apps to be 64bit.
It is compatible with OS X 10.14 and older version.
Will your M.2 NVMe product support NVMe Module with B+M Key (PCIe Gen 3 x2)? [#12232019]
Yes, All our M.2 NVMe Enclosures supports NVMe Module both M Key (PCIe Gen3 x4) or B+M Key (PCIe Gen3 x2). Example of NVMe with B+M Key is the WD Blue SN500 NVMe SSD, Part# WDS250G1B0C, WDS500G1B0C.
Please do not get confuse M.2 NVMe B+M Key with M.2 SSD B+M Key. M.2 SSD Module will not function in the NVMe enclosure or on the NVMe add-on card.
Yes, All our M.2 NVMe Add-on Card supports NVMe Module both M Key (PCIe Gen3 x4) or B+M Key (PCIe Gen3 x2) too.
If you are not sure write to support@vantecusa.com for assistance.
Will the NST-271C31-BK support TRIM? [02072020]
Yes, the NST-271C31-BK will support TRIM.
If you have an older version that will not support TRIM, please use this link to update the firmware.
https://www.vantecusa.com/CKEdit/files/NST-271C31-BK_TRIM.zip
Download, unzip and follow the pdf instruction to flash the firmware.
How to use C to C or C to A USB cable on some enclosures that comes with these cable [#03042020]
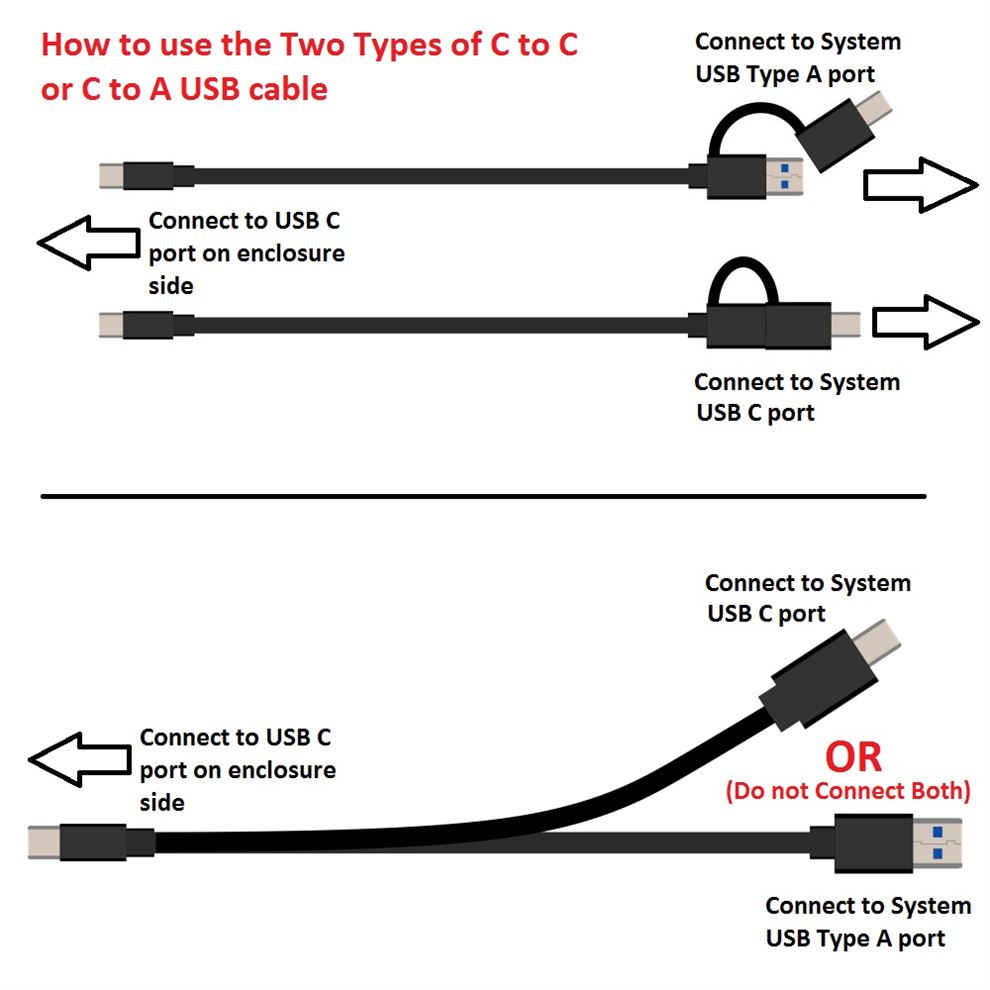
Some enclosures you purchase may come with the following USB cable shown below or Dual cable.
For USB cable shown below, the right way to connect the cable is to plug the single USB C to the enclosure first
and the other end to your system USB port shown. Do not reverse the connection, it may not work.
For Dual cable (two cable, C to C and C to A) the right way to connect the cable is to see what type or port is available
on your system and use the C to C or C to A. First plug the single USB C to the enclosure and the other end to your system USB port
Firmware update for the OLDER NST-205C3-SG (NON-TOOLESS ONLY) and NST-206C3-SG (NON-TOOLESS ONLY) [#03062020]
There is a Firmware update for the OLDER NST-205C3-SG (NON-TOOLESS ONLY) OR NST-206C3-SG (NON-TOOLESS ONLY).
This firmware update will not affect the module and can be performed with or without the NVMe module. This firmware is for correcting issues with WD NVMe with 2 lanes, if you are not using 2 lanes module, you do not need this firmware.
This firmware is only for the very early version of the enclosure. If you just purchase a new enclosure, you do not need this firmware.
Just plug the enclosure into the System USB port and run the firmware update software. If your enclosure firmware is current, it will not change. If your enclosure firmware is not current, it will update to the latest.
Here is the link: https://www.vantecusa.com/CKEdit/files/NST-205C3_206C3_FW_UpdateUtility_v133_01_00_02_03_06.zip
For further help, please write to VantecUSA support, you can reach them at support@vantecusa.com
How to use the Write protect switch on NST-203C3-SV, NST-204C3-SV, NST-205C3-SG, NST-206C3-SG and NST-207C3-RBG [#06012020]
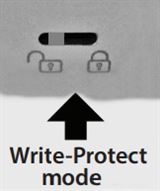
The write-protect switch on these enclosures is designed to block any OS-level file access.
The switch needs to be set first before it is connected to the USB port.
To change the storage to read-only, change the switch to lock position and plug the USB to your system like you normally do and you will see the OS view the files as read-only.
To change from lock to unlock or vise-versa, do a USB “safe to remove” first, unplug the device from the USB port, change the switch setting, and plug it back into your system.
It is not designed to change the mode while the storage is connected to the system. Changing mode while connected may produce an undesirable result.